Documentation for Developers
This section is intended for developers who are interested in the technical details of the implementation that is provided by this project. It comes with information about the project’s structure, contains detailed instructions for compiling its source code and provides a documentation of the algorithm’s public APIs that can be used by custom Python or C++ code in case you are interested in extending its functionality.
Project Structure
The BOOMER algorithm follows a unified framework for the implementation of different kinds of multi-label rule learning algorithms. Due to its modularity, different implementations can be used for the various aspects of the algorithm. This enables to flexibly adjust the algorithm to different datasets and use cases. For example, several approximation techniques, such as sampling methods, are available. Whereas such methods usually come with a minor deterioration in terms of predictive accuracy, they are often indispensable in cases where large datasets should be handled. An overview of the parameters that may be used to configure the BOOMER algorithm is provided in the Parameters section.
Furthermore, the algorithm’s implementation is split into several components. For maximum efficiency, all aspects of the core algorithm are written in C++. To provide a user-friendly interface and to integrate the algorithm with the widely used scikit-learn framework, a Python API is provided. It relies on the Cython programming language to interact with the underlying C++ implementation. A schematic depiction of the project’s structure is shown in the following.
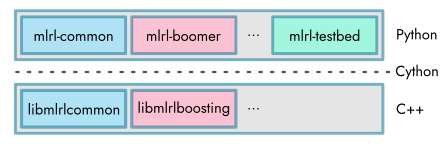
By providing a shared library that implements the algorithmic aspects , all multi-label rule learning algorithms have in common (“libmlrlcommon”), the implementation of different types of learning methods (“libmlrlboosting” and possibly others) is facilitated. This is especially relevant for developers or scientists who want to build upon BOOMER’s source code for the development of novel machine learning approaches (see C++ API Documentation). The low-level libraries are used by higher-level Python modules. Again, this includes a module that provides common functionality (“mlrl-common”), as well as modules that correspond to specific instantiations of different learning algorithms (“mlrl-boomer” and possibly others). For further information on the available Python modules, refer to the Python API Documentation.
The application of machine learning methods, as well as scientific research in this area, typically require to evaluate and compare the performance of different kinds of learning approaches, to identify optimal parameter settings for a particular use case, or to analyze the decisions that are made by a previously trained model. To reduce the burden that comes with such tasks, this project also includes a Python module that allows to perform experiments using the BOOMER algorithm via a command line API. It provides means for parameter tuning and eases to collect experimental results in terms of commonly used evaluation measures or the characteristics of models or datasets. Information on how to use these tools can be found in the Command Line API section.
Building from Source
As discussed in the previous section Project Structure, the algorithm that is provided by this project is mostly implemented in C++ to ensure maximum efficiency (requires C++ 14 or newer). In addition, a Python wrapper that integrates the algorithm with the scikit-learn framework is provided (requires Python 3.7 or newer). To make the underlying C++ implementation accessible from within the Python code, Cython is used (requires Cython 29 or newer).
Unlike pure Python programs, the C++ and Cython source files must be compiled for a particular target platform. To ease the process of compiling the source code, the project comes with a Makefile that automates the necessary steps. In the following, we discuss the individual steps that are necessary for building the project from scratch. This is necessary if you intend to modify the library’s source code. If you want to use the algorithm without any custom modifications, the Installation of pre-built packages is usually a better choice.
Prerequisites
As a prerequisite, a supported version of Python, a suitable C++ compiler, as well as an implementation of the Make build automation tool, must be installed on the host system. The installation of these software components depends on the operation system at hand. In the following, we provide installation instructions for the supported platforms.
Linux: Nowadays, most Linux distributions include a pre-installed version of Python 3. If this is not the case, instructions on how to install a recent Python version can be found in Python’s Beginners Guide. As noted in this guide, Python should be installed via the distribution’s package manager if possible. The most common Linux distributions do also ship with GNU Make and the GNU Compiler Collection (GCC) by default. If this is not the case, these software packages can typically be installed via the distribution’s default package manager.
MacOS: Recent versions of MacOS do not include Python by default. A suitable Python version can manually be downloaded from the project’s website. Alternatively, the package manager Homebrew can be used for installation via the command
brew install python. MacOS relies on the Clang compiler for building C++ code by default. It is part of the Xcode developer toolset. In addition, for proper multi-threading support, the OpenMP library must be installed. We recommend to install it via Homebrew by running the commandbrew install libomp.Windows: Python releases for Windows are available at the project’s website. In addition, an implementation of the Make tool must be installed. We recommend to use GNU Make for Windows. For the compilation of the project’s source code, the MSVC compiler must be used. It is included in the Build Tools for Visual Studio. Finally, Powershell must be used to run the project’s Makefile. It should be included by default on modern Windows systems.
Additional compile- or build-time dependencies will automatically be installed when following the instructions below and must not be installed manually.
Step 1: Creating a virtual environment
The build process is based on creating a virtual Python environment that allows to install build-time dependencies in an isolated manner and independently from the host system. Once all packages have successfully been built, they are installed into the virtual environment. To create new virtual environment and install all necessarily build-time dependencies, the following command must be executed:
make venv
All compile-time dependencies (numpy, scipy, cython, meson, ninja, etc.) that are required for building the project should automatically be installed into the virtual environment when executing the above command. As a result, a subdirectory venv/ should have been created in the project’s root directory.
Step 2: Compiling the C++ code
Once a new virtual environment has successfully been created, the compilation of the C++ code can be started by executing the following command:
make compile_cpp
Compilation is based on the build system Meson and uses Ninja as a backend. After the above command has been completed, a new directory cpp/build/ should have been created. It contains the shared libraries (“libmlrlcommon”, “libmlrlboosting” and possibly others) that provide the basic functionality of the project’s algorithms.
Step 3: Compiling the Cython code
Once the compilation of the C++ code has completed, the Cython code that allows to access the corresponding shared libraries from within Python can be compiled in the next step. Again, Meson and Ninja are used for compilation. It can be started via the following command:
make compile_cython
As a result of executing the above command, the directory python/build should have been created. It contains Python extension modules for the respective target platform.
Note
Instead of performing the previous steps one after the other, the command make compile can be used to compile the C++ and Cython source files in a single step.
Step 4: Copying compilation files into the Python source tree
The shared library files and Python extension modules that have been created in the previous steps must afterwards be copied into the source tree that contains the Python code. This can be achieved by executing the following commands:
make install_cpp
make install_cython
This should result in the compilation files, which were previously located in the cpp/build/ and python/build/ directories, to be copied into the cython/ subdirectories that are contained by each Python module (e.g., into the directory python/subprojects/common/mlrl/common/cython/).
Step 5: Building wheel packages
Once the compilation files have been copied into the Python source tree, wheel packages can be built for the individual Python modules via the following command:
make wheel
This should result in .whl files being created in a new dist/ subdirectory inside the directories that correspond to the individual Python modules (e.g., in the directory python/subprojects/common/dist/).
Step 6: Installing the wheel packages into the virtual environment
The wheel packages that have previously been created, as well as its runtime-dependencies (e.g., scikit-learn or liac-arff), can finally be installed into the virtual environment via the following command:
make install
After this final step has completed, the Python packages can be used from within the virtual environment. To ensure that the installation of the wheel packages was successful, check if a mlrl/ directory has been created in the lib/ directory of the virtual environment (depending on the Python version, it should be located at venv/lib/python3.9/site-packages/mlrl/ or similar). If this is the case, the algorithm can be used from within your own Python code. Alternatively, the command line API can be used to start an experiment (see Running Experiments).
Warning
Whenever any C++, Cython or Python source files have been modified, they must be recompiled and updated wheel packages must be installed into the virtual environment by executing the command make install. If any compilation files do already exist, this will only result in the affected parts of the code to be rebuilt.
Cleanup
The Makefile allows to delete the files that result from the individual steps that have been described above. To delete the wheel packages that have been created via the command make wheel the following command can be used:
make clean_wheel
The following command allows to remove the shared library files and Python extension modules that have been copied into the Python source tree via the commands make install_cpp and make install_cython:
make clean_install
The commands make clean_cython and make clean_cpp remove the Cython or C++ compilation files that have been created via the command make compile_cython or make compile_cpp from the respective build/ directories. If you want to delete both, the Cython and C++ compilation files, the following command can be used:
make clean_compile
Note
If you want to delete all compilation files that have been created via the Makefile, including the virtual environment, you should use the command make clean.
Generating the Documentation
In order to generate the documentation (this document), Doxygen must be installed on the host system beforehand. It is used to generate an API documentation from the C++ source files. By running the following command, the C++ API documentation is generated via Doxygen, the Python API documentation is created via sphinx-apidoc and the documentation’s HTML files are generated via sphinx:
make doc
Afterwards, the generated files can be found in the directory doc/build_/html/.
To clean up the generated documentation files, the following command can be used:
make clean_doc
C++ API Documentation
The core aspects of the algorithms that are provided by this project are implemented by the following C++ libraries:
Python API Documentation
The following Python modules that ease to use the different algorithms that are included in this project are available: